> ## Documentation Index
> Fetch the complete documentation index at: https://pigeonholeapp.co.uk/docs/llms.txt
> Use this file to discover all available pages before exploring further.
# Automating Child Onboarding
> Run your whole onboarding process through custom forms — a public application form, an AI-built child record, auto-assigned follow-up forms, and a profile that fills itself in.
Onboarding a new child is the most paperwork-heavy thing a nursery office does. An enquiry
arrives, somebody types the child onto the system, somebody else posts or emails out a stack
of permission and medical forms, and then all of those answers get typed in a second time.
You can run the whole thing through custom forms instead. Publish an application form on your
website, and from the moment a parent submits it Pigeonhole does the data entry — building
the child's record from the application, sending the follow-up forms out on its own, and
filling the answers into the profile as they come back. Your job becomes reading and
approving rather than typing.
Open in app: [Form Submissions](https://pigeonholeapp.co.uk/app/admin/forms) · [Settings → Forms](https://pigeonholeapp.co.uk/app/admin/settings/forms).
## The cycle
1. **Publish a public application form** — one shareable link on your website. No account needed, no assigning anyone.
2. **Create the child from the application** — the AI reads the submission and builds the child, their parents and their emergency contacts.
3. **Follow-up forms assign themselves** — permissions, medical, dietary; every form set to auto-assign lands the moment the child exists.
4. **Apply the answers to the profile** — each completed form is merged into the child's record, tidied and summarised, for you to check and save.
Set up once, and every subsequent child runs through it without anyone remembering to do
anything.
***
## Step 1: Publish a public application form
Build one form that asks everything you'd ask on a paper registration form — child's details,
parents, emergency contacts, the essentials on allergies and medical needs.
1. Go to **Settings → Forms** and click **Add Form**.
2. Set **Assignment Type** to **Child**.
3. Turn on **Allow Public Access** so anyone with the link can submit it.
4. Turn on **Answers update the child profile** so the AI actions are available on the
submissions.
5. Build your sections and fields, then **Save Form**.
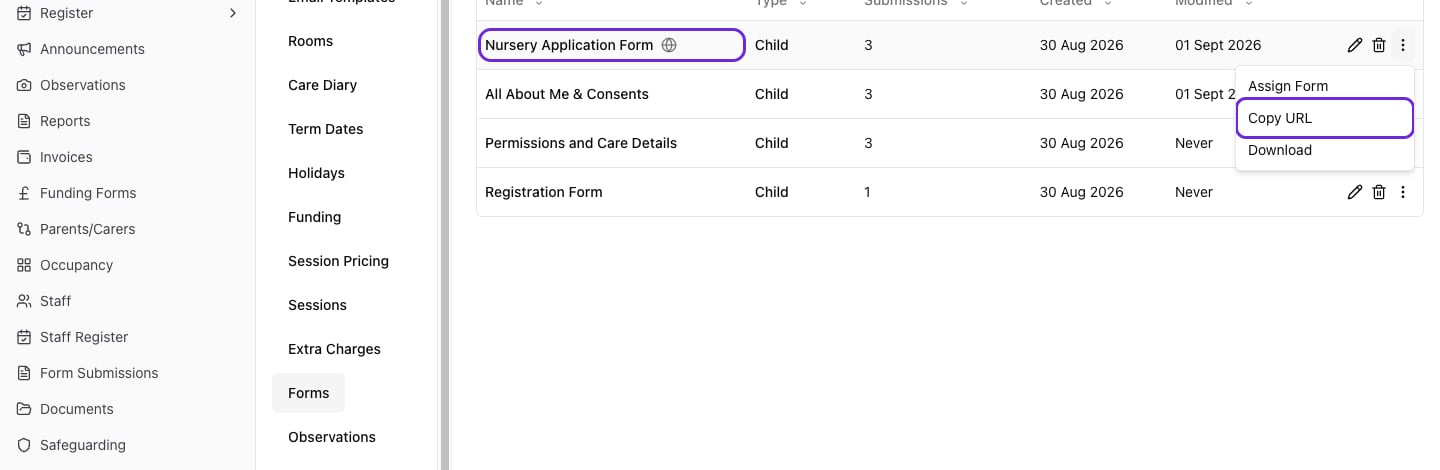
Back on the forms list, a globe icon marks the form as public. Open the **More Actions** (…)
menu and choose **Copy URL**, then put that link on your website's admissions page or in your
enquiry reply email.
 Prefer to send the form to one specific parent? Assign it to their email address instead —
they still don't need an account. See [Assigning Forms](/docs/managers/custom-forms/assigning-forms).
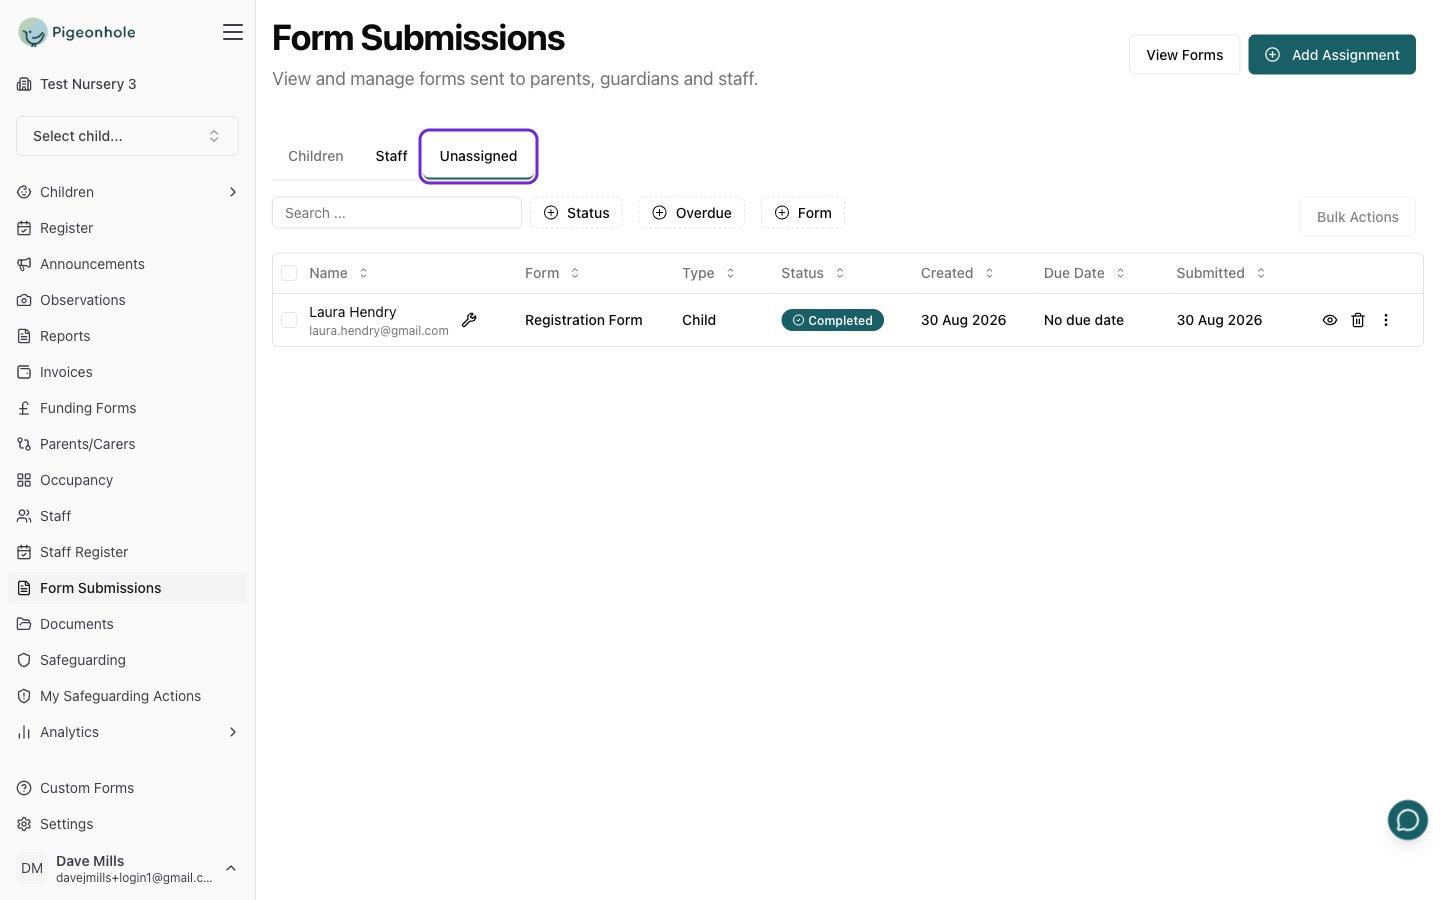
When a parent submits, the completed application appears on the **Form Submissions** page
under the **Unassigned** tab, because it isn't linked to a child yet.
Prefer to send the form to one specific parent? Assign it to their email address instead —
they still don't need an account. See [Assigning Forms](/docs/managers/custom-forms/assigning-forms).
When a parent submits, the completed application appears on the **Form Submissions** page
under the **Unassigned** tab, because it isn't linked to a child yet.
 ***
## Step 2: Create the child from the application
Click the **Eye** icon to open the submission and read what the parent sent. The actions live
inside this view rather than in the row menu, so you always have the answers in front of you
before you commit.
***
## Step 2: Create the child from the application
Click the **Eye** icon to open the submission and read what the parent sent. The actions live
inside this view rather than in the row menu, so you always have the answers in front of you
before you commit.
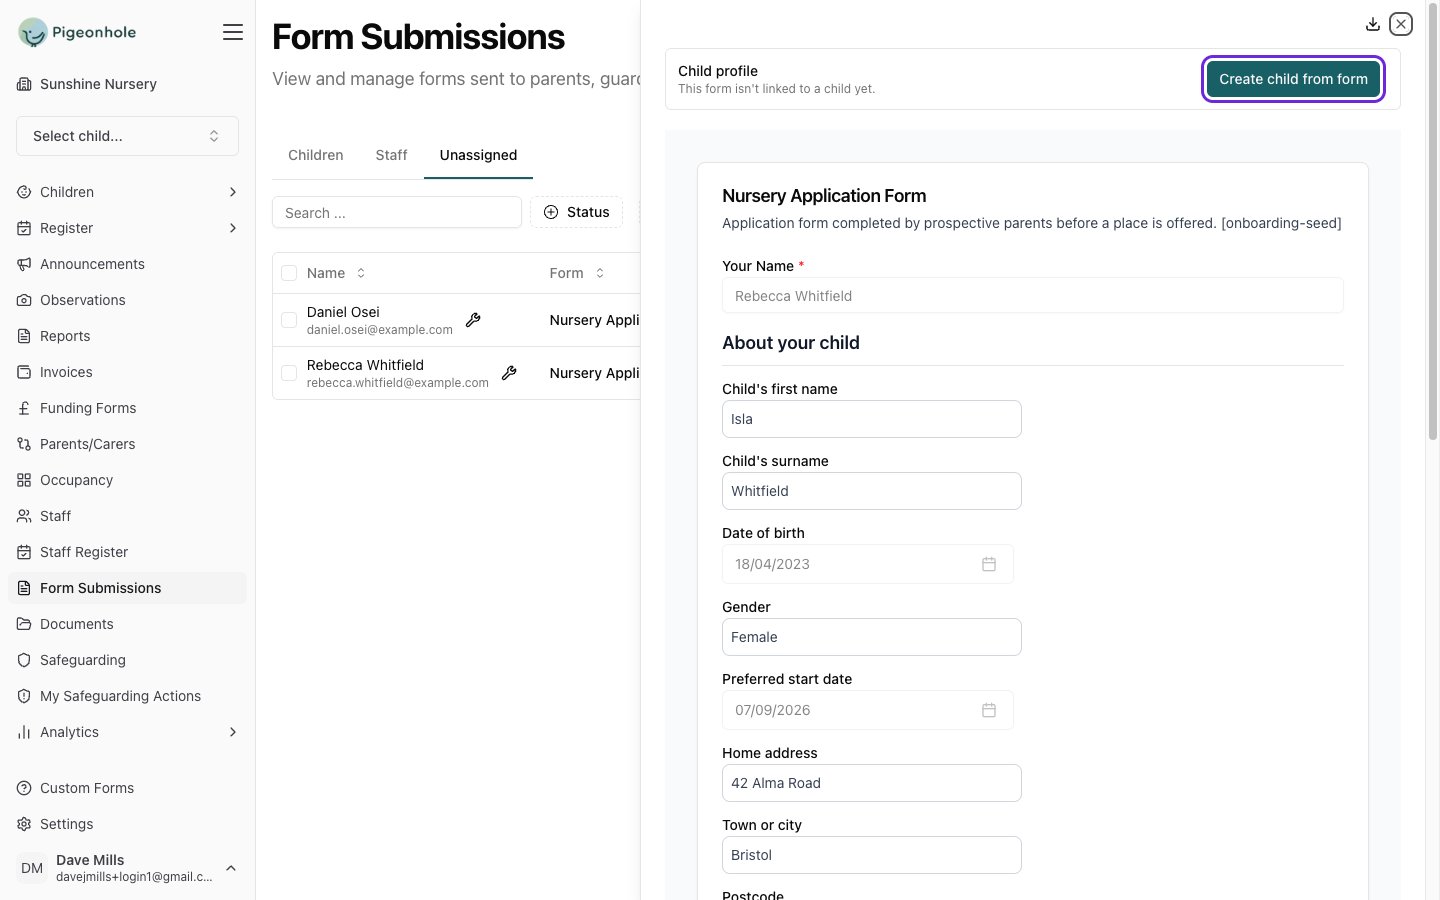 Click **Create child from form**. Pigeonhole reads the submission and proposes a complete
child record, which opens beside the original answers so you can check one against the other.
Click **Create child from form**. Pigeonhole reads the submission and proposes a complete
child record, which opens beside the original answers so you can check one against the other.
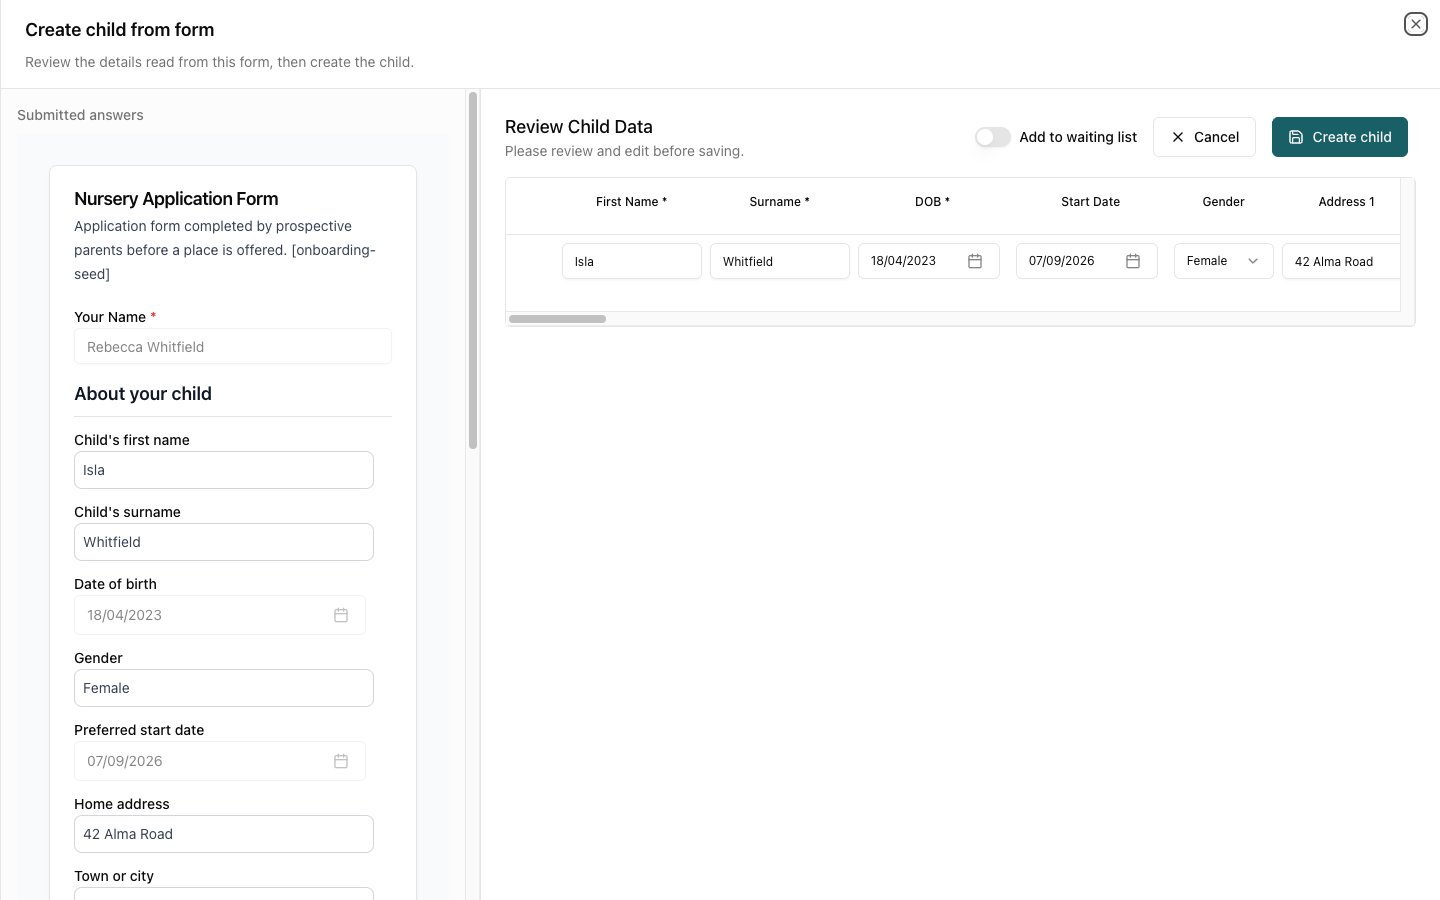 What gets built:
* **The child** — name, date of birth, gender, address, languages, start date and so on
* **Parents and carers** — up to two, matched to existing records by email address so you
never end up with a duplicate parent
* **Emergency contacts** — added to the child's contacts
* **Custom attributes and permissions** — anything your form asked about that maps to a field
on the profile
Nothing is saved until you press **Create child**. Every value is editable first, so treat
this as a first draft to check.
Not ready to enrol them yet? Turn on **Add to waiting list** before saving and the child is
created on your waiting list instead. Moving them off the waiting list later counts as
enrolling them, and triggers the auto-assigned forms in step 3.
### Parents that already exist
If a parent's email address matches someone already on your system — a sibling's parent, for
instance — Pigeonhole links the child to that existing record rather than creating a second
one. The parent's name and contact details are shown greyed out, because they belong to the
existing record and aren't edited from here.
For the full detail of what the AI reads and the rules it follows, see
[AI Form Processing](/docs/managers/custom-forms/ai-form-processing).
***
## Step 3: Follow-up forms assign themselves
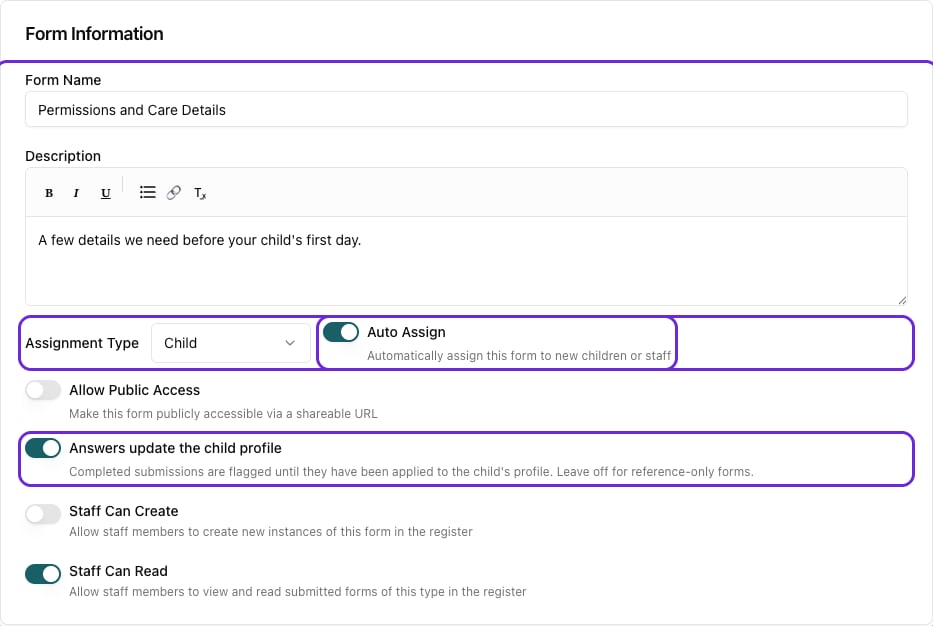
This is the step that removes the remembering. Any form with **Auto Assign** switched on is
assigned to a child the moment they're created — including children created from an
application in step 2.
Set it up once, when you build each form:
1. Go to **Settings → Forms** and open the form.
2. Turn on **Auto Assign**.
3. Turn on **Answers update the child profile** if the answers belong on the profile.
4. **Save Form**.
What gets built:
* **The child** — name, date of birth, gender, address, languages, start date and so on
* **Parents and carers** — up to two, matched to existing records by email address so you
never end up with a duplicate parent
* **Emergency contacts** — added to the child's contacts
* **Custom attributes and permissions** — anything your form asked about that maps to a field
on the profile
Nothing is saved until you press **Create child**. Every value is editable first, so treat
this as a first draft to check.
Not ready to enrol them yet? Turn on **Add to waiting list** before saving and the child is
created on your waiting list instead. Moving them off the waiting list later counts as
enrolling them, and triggers the auto-assigned forms in step 3.
### Parents that already exist
If a parent's email address matches someone already on your system — a sibling's parent, for
instance — Pigeonhole links the child to that existing record rather than creating a second
one. The parent's name and contact details are shown greyed out, because they belong to the
existing record and aren't edited from here.
For the full detail of what the AI reads and the rules it follows, see
[AI Form Processing](/docs/managers/custom-forms/ai-form-processing).
***
## Step 3: Follow-up forms assign themselves
This is the step that removes the remembering. Any form with **Auto Assign** switched on is
assigned to a child the moment they're created — including children created from an
application in step 2.
Set it up once, when you build each form:
1. Go to **Settings → Forms** and open the form.
2. Turn on **Auto Assign**.
3. Turn on **Answers update the child profile** if the answers belong on the profile.
4. **Save Form**.
 Typical forms to auto-assign:
| Form | Why |
| ---------------------------- | ------------------------------------------------------------------------------ |
| **Permissions and consents** | Photos, sun cream, outings, face painting — all land on the profile as toggles |
| **Medical and dietary** | Allergies, conditions, medication, dietary needs |
| **All about me** | Routines, comforters, settling-in information |
| **Authorised collectors** | Adds the people allowed to collect the child to their contacts |
Auto-assigned forms are created but **not emailed automatically**. They appear on the child's
Forms tab and on the Form Submissions page ready to go — send them from there, either one at
a time with **Send Form** or in bulk. This is deliberate: it gives you a chance to check the
child's record before anything reaches the parent.
***
## Step 4: Apply the completed answers to the profile
When a follow-up form comes back, it appears in the **Children** tab, linked to the child. If
the form updates the profile and hasn't been applied yet, an amber warning triangle appears
next to the child's name — a visible to-do list of profiles that are out of date.
Typical forms to auto-assign:
| Form | Why |
| ---------------------------- | ------------------------------------------------------------------------------ |
| **Permissions and consents** | Photos, sun cream, outings, face painting — all land on the profile as toggles |
| **Medical and dietary** | Allergies, conditions, medication, dietary needs |
| **All about me** | Routines, comforters, settling-in information |
| **Authorised collectors** | Adds the people allowed to collect the child to their contacts |
Auto-assigned forms are created but **not emailed automatically**. They appear on the child's
Forms tab and on the Form Submissions page ready to go — send them from there, either one at
a time with **Send Form** or in bulk. This is deliberate: it gives you a chance to check the
child's record before anything reaches the parent.
***
## Step 4: Apply the completed answers to the profile
When a follow-up form comes back, it appears in the **Children** tab, linked to the child. If
the form updates the profile and hasn't been applied yet, an amber warning triangle appears
next to the child's name — a visible to-do list of profiles that are out of date.
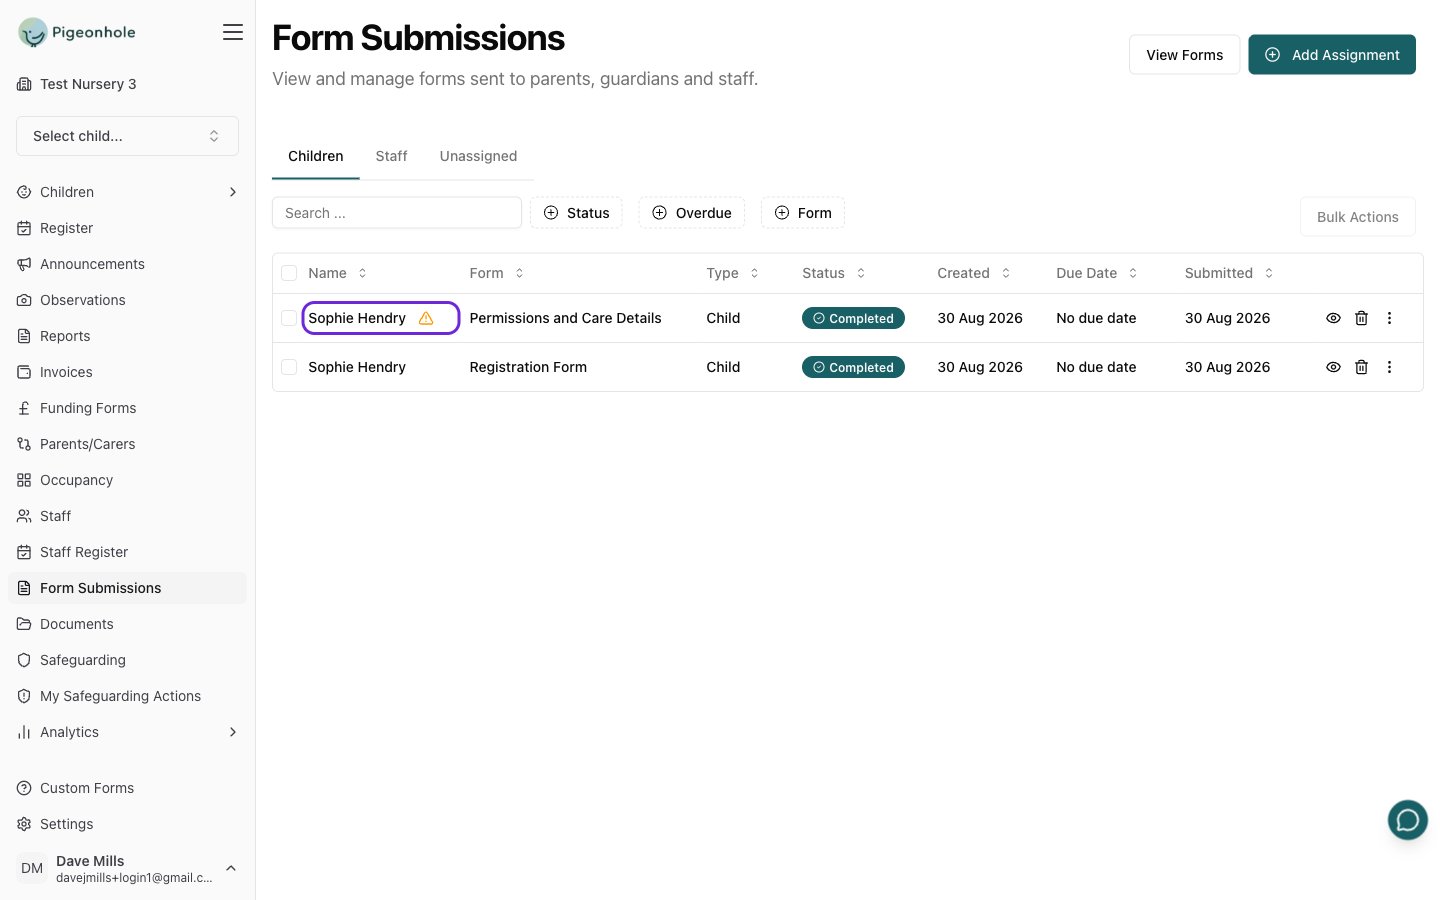 Open the submission and click **Apply to child profile**.
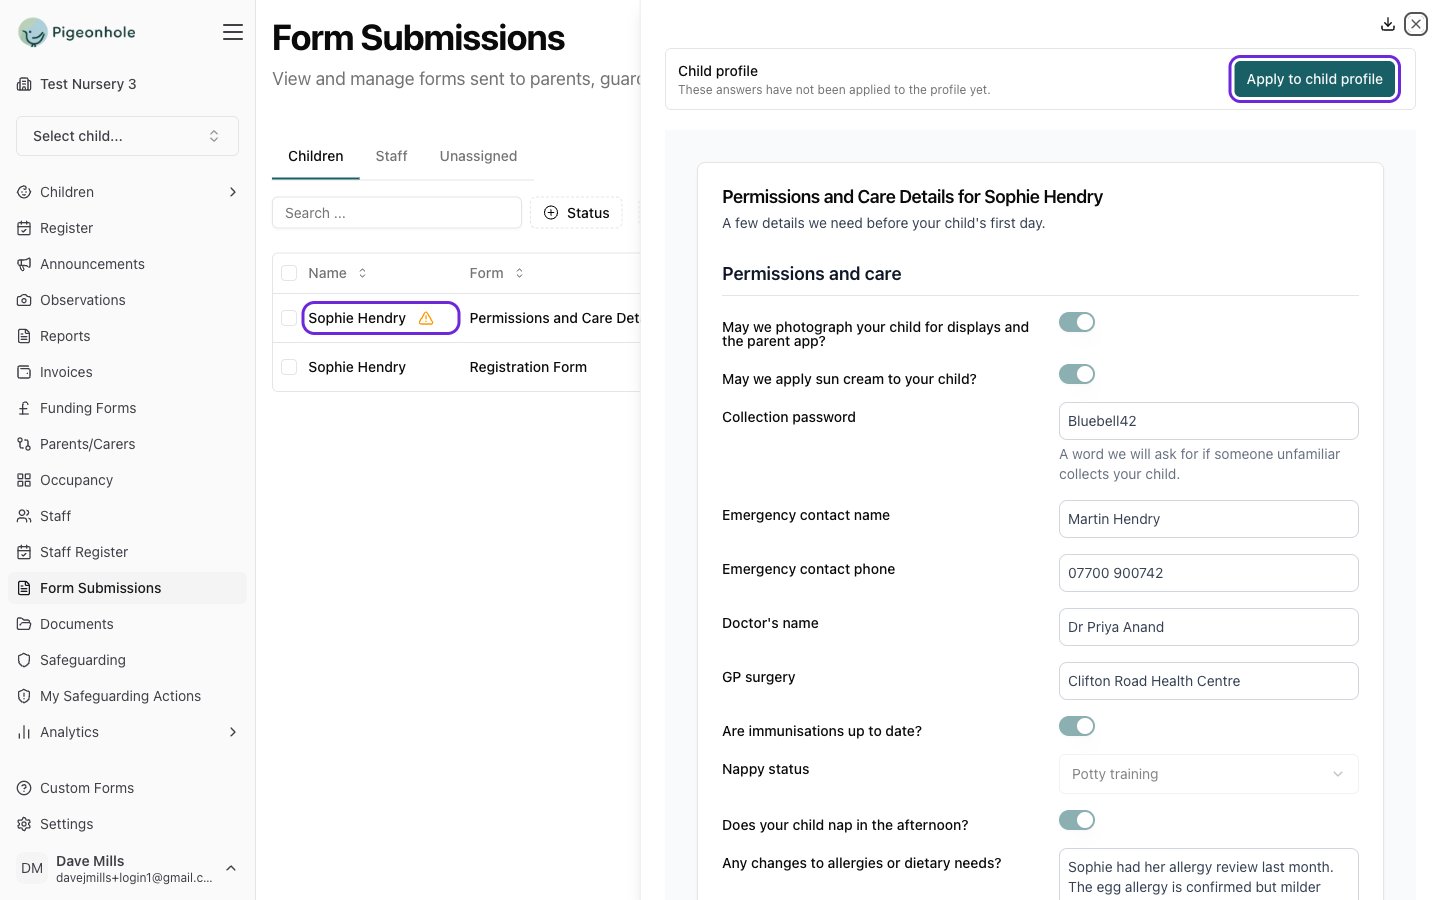 The child's profile opens beside the form, pre-filled. Every field the AI has filled in is
highlighted in amber with the value it would replace shown alongside, so you can see at a
glance what's about to change.
The child's profile opens beside the form, pre-filled. Every field the AI has filled in is
highlighted in amber with the value it would replace shown alongside, so you can see at a
glance what's about to change.
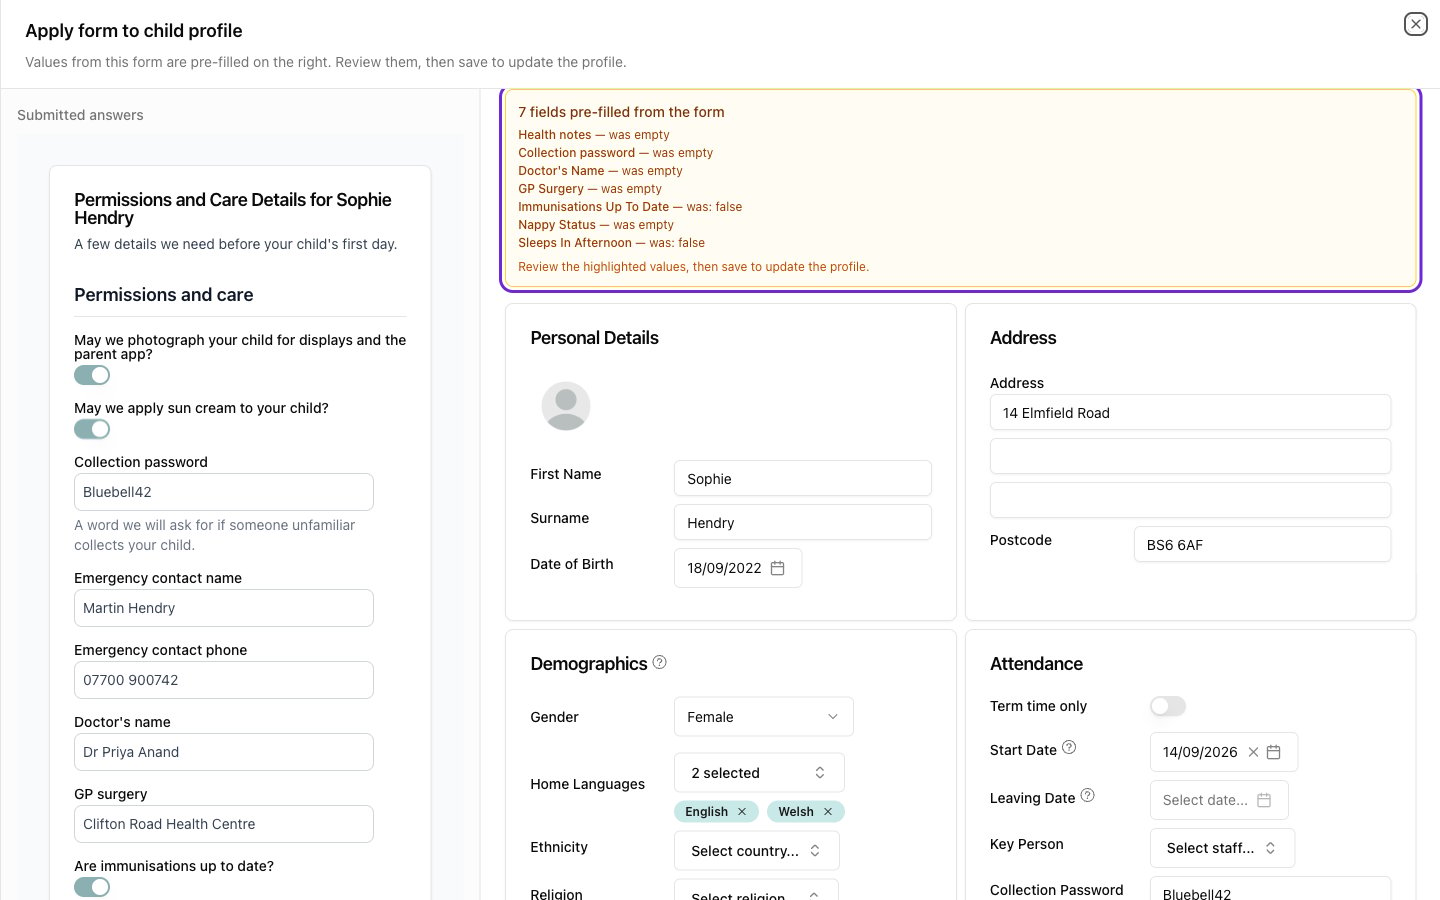 Check the highlighted values, adjust anything you disagree with, then press **Save**. The
warning triangle disappears and the child's record is current.
Always read the suggested values before saving, particularly allergies, medical details and
permissions. You are responsible for what ends up on a child's record.
### Long answers are summarised
Parents write in prose, and profile fields need to be readable at a glance by whoever is
covering the room. Long free-text answers are condensed into the relevant profile field,
keeping what matters clinically — the substance, the severity, the medication, what staff
should do — and dropping the padding.
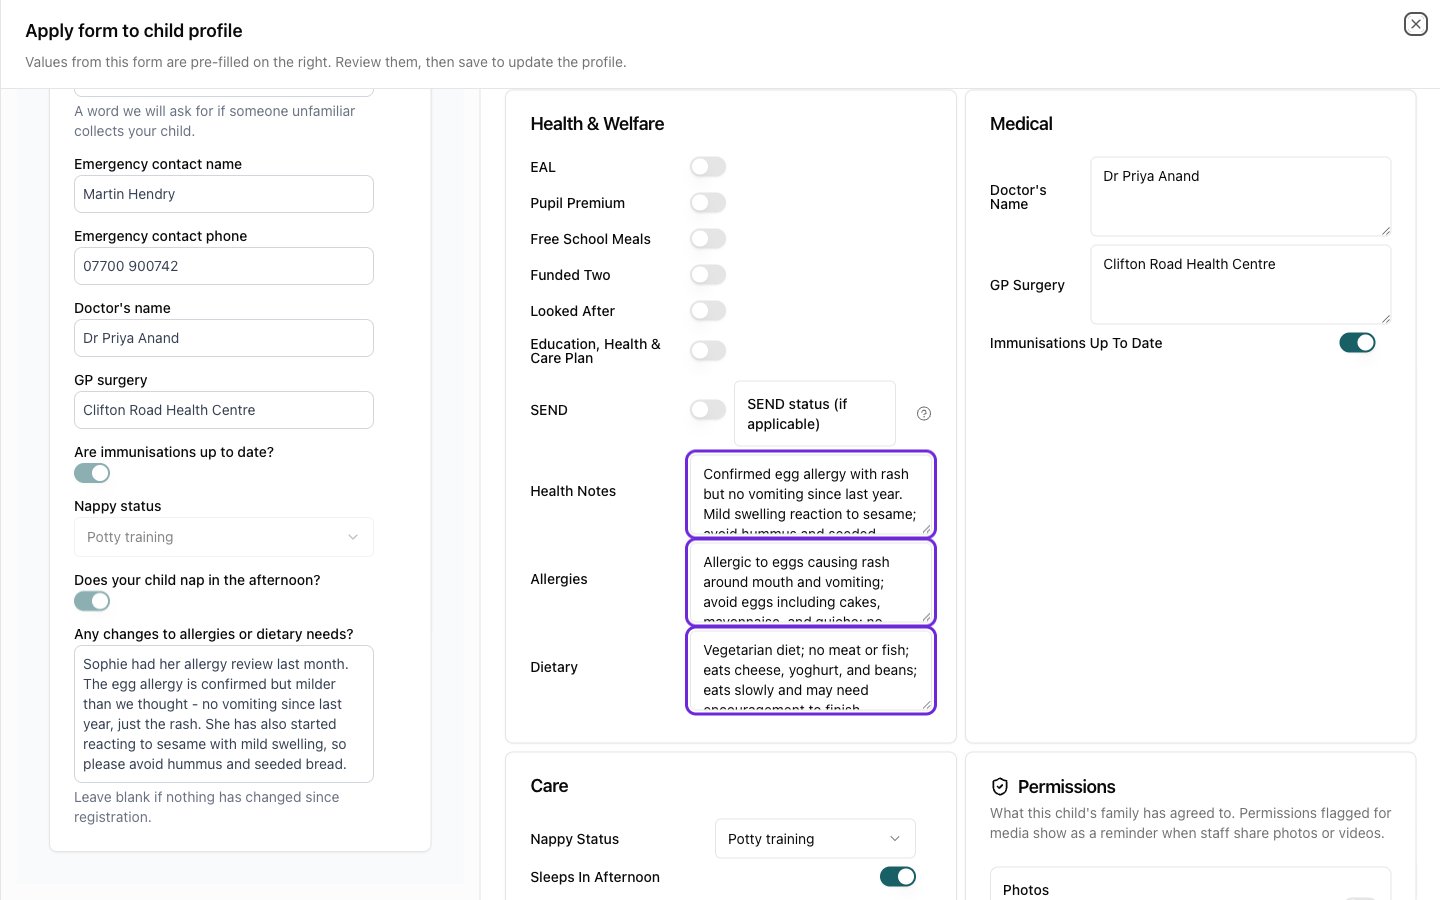
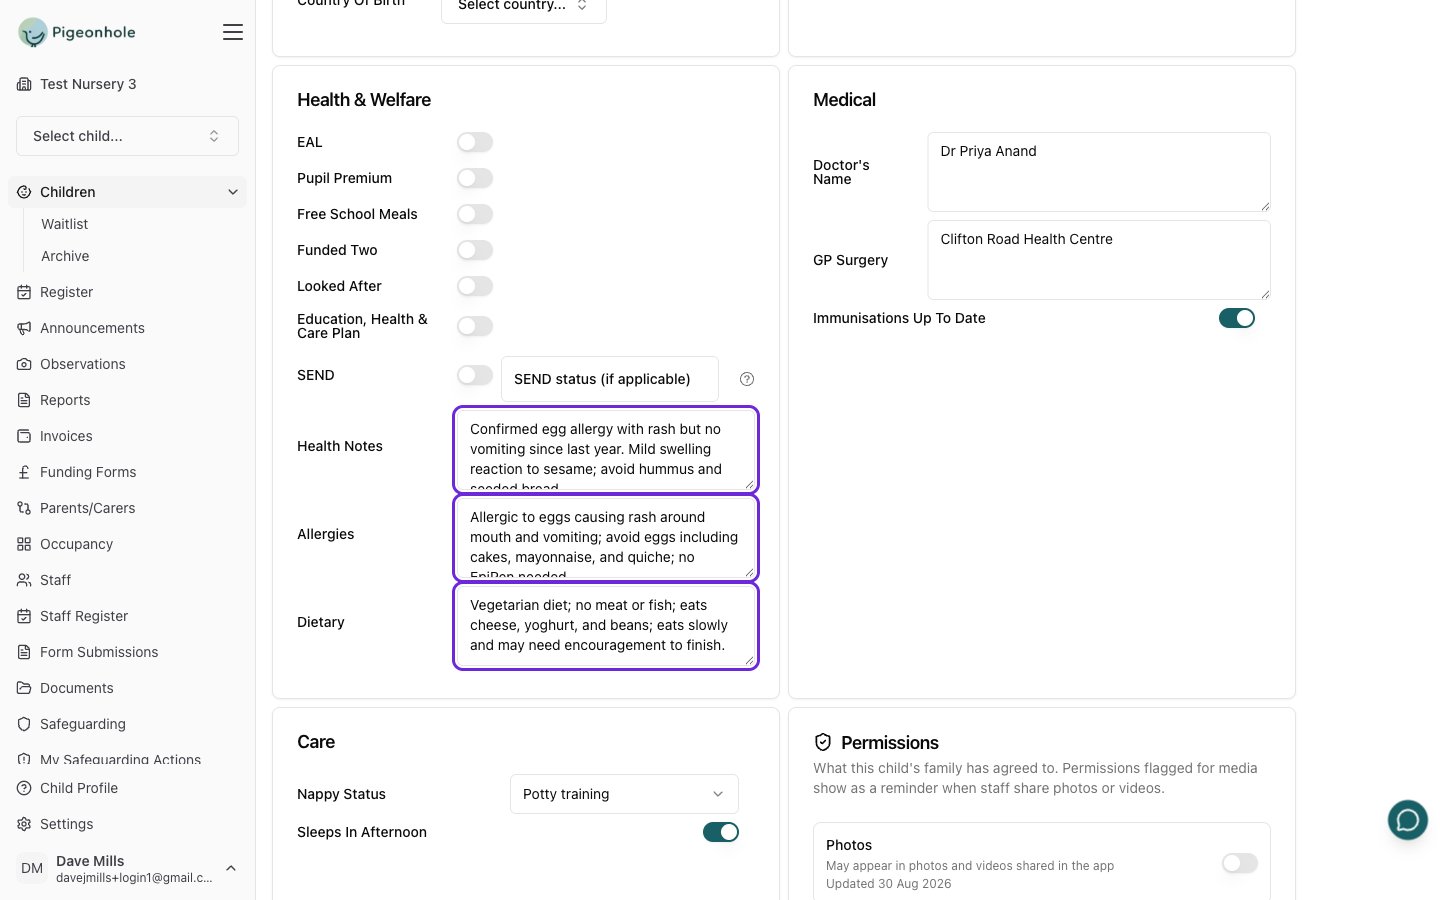
In the example below the parent wrote several sentences about an allergy review. It arrives
on the profile as three short, specific entries under Health Notes, Allergies and Dietary.
Check the highlighted values, adjust anything you disagree with, then press **Save**. The
warning triangle disappears and the child's record is current.
Always read the suggested values before saving, particularly allergies, medical details and
permissions. You are responsible for what ends up on a child's record.
### Long answers are summarised
Parents write in prose, and profile fields need to be readable at a glance by whoever is
covering the room. Long free-text answers are condensed into the relevant profile field,
keeping what matters clinically — the substance, the severity, the medication, what staff
should do — and dropping the padding.
In the example below the parent wrote several sentences about an allergy review. It arrives
on the profile as three short, specific entries under Health Notes, Allergies and Dietary.
 ### Permissions
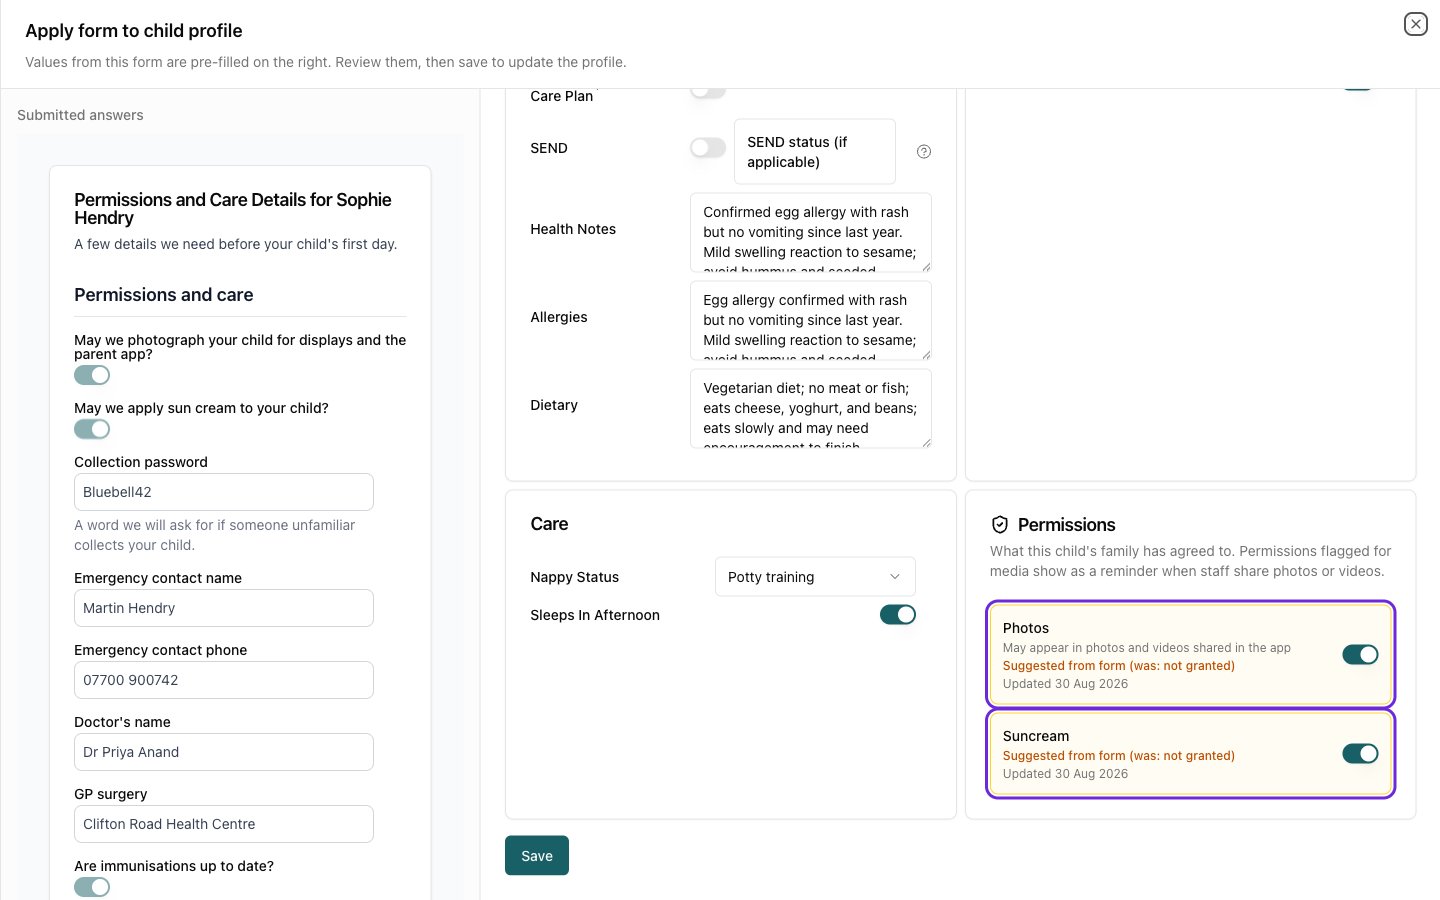
Yes/no consent questions are matched to your permission types and proposed as toggles, marked
**Suggested from form** with the value they'd replace. They save with the rest of the profile
in one go.
### Permissions
Yes/no consent questions are matched to your permission types and proposed as toggles, marked
**Suggested from form** with the value they'd replace. They save with the rest of the profile
in one go.
 ### Existing information is never lost
Applying a form combines rather than replaces. A new allergy is added alongside one already
recorded, a severity is never downgraded, and a parent answering "None" cannot clear
something you already hold. Contacts the form doesn't mention are left alone. See
[AI Form Processing](/docs/managers/custom-forms/ai-form-processing#merging-into-an-existing-profile)
for the full set of rules.
### The finished profile
### Existing information is never lost
Applying a form combines rather than replaces. A new allergy is added alongside one already
recorded, a severity is never downgraded, and a parent answering "None" cannot clear
something you already hold. Contacts the form doesn't mention are left alone. See
[AI Form Processing](/docs/managers/custom-forms/ai-form-processing#merging-into-an-existing-profile)
for the full set of rules.
### The finished profile
 ***
## Keeping profiles current after onboarding
The same cycle works long after a child has started. Send the permissions form round again
each September, or a medical update form after a change, and apply the answers the same way.
Re-applying a form is safe: it proposes the current answers against the current profile, so
nothing is duplicated.
***
## Setting it up: a checklist
1. **Build the application form** — **Assignment Type: Child**, **Allow Public Access** on, **Answers update the child profile** on. Copy the URL onto your website.
2. **Build your follow-up forms** — permissions, medical, all-about-me. **Auto Assign** on, **Answers update the child profile** on.
3. **Check your permission types and custom attributes** — the AI matches consent questions to your permission types by name, so wording your form questions close to those names gives the cleanest results.
4. **Decide who handles submissions** — creating a child and applying to a profile need **Admin** or **Child Admin** access. Everyone with that access sees the amber triangles as their to-do list.
***
## Frequently asked questions
No. Every value is proposed for review and nothing is written until you press **Save** or
**Create child**. The one thing that does happen on its own is assigning auto-assign
forms to a new child — and even those aren't emailed until you send them.
They're matched by email address and the child is linked to the existing record, so you
don't get duplicates. Their details are shown read-only.
No. Creating and applying to child profiles is only available on forms of type **Child**.
They stay on the form submission, which remains attached to the child's record and can be
viewed or downloaded at any time. Nothing is lost.
Correct it in the review view before saving. If you've already saved, edit the child's
profile as normal.
Either it's already been applied, or the form doesn't have **Answers Update The Child
Profile** enabled. Unassigned submissions aren't flagged either, because there's no child
to be out of date with yet.
Yes — that's what public forms are for. The URL is stable and the same for everyone, so
you can link it from an admissions page, an enquiry auto-reply, or social media.
Each submission arrives as a separate entry on the Unassigned tab. Create the child from
whichever is correct, and the other can be assigned to that child afterwards or left as a
record.
***
## Keeping profiles current after onboarding
The same cycle works long after a child has started. Send the permissions form round again
each September, or a medical update form after a change, and apply the answers the same way.
Re-applying a form is safe: it proposes the current answers against the current profile, so
nothing is duplicated.
***
## Setting it up: a checklist
1. **Build the application form** — **Assignment Type: Child**, **Allow Public Access** on, **Answers update the child profile** on. Copy the URL onto your website.
2. **Build your follow-up forms** — permissions, medical, all-about-me. **Auto Assign** on, **Answers update the child profile** on.
3. **Check your permission types and custom attributes** — the AI matches consent questions to your permission types by name, so wording your form questions close to those names gives the cleanest results.
4. **Decide who handles submissions** — creating a child and applying to a profile need **Admin** or **Child Admin** access. Everyone with that access sees the amber triangles as their to-do list.
***
## Frequently asked questions
No. Every value is proposed for review and nothing is written until you press **Save** or
**Create child**. The one thing that does happen on its own is assigning auto-assign
forms to a new child — and even those aren't emailed until you send them.
They're matched by email address and the child is linked to the existing record, so you
don't get duplicates. Their details are shown read-only.
No. Creating and applying to child profiles is only available on forms of type **Child**.
They stay on the form submission, which remains attached to the child's record and can be
viewed or downloaded at any time. Nothing is lost.
Correct it in the review view before saving. If you've already saved, edit the child's
profile as normal.
Either it's already been applied, or the form doesn't have **Answers Update The Child
Profile** enabled. Unassigned submissions aren't flagged either, because there's no child
to be out of date with yet.
Yes — that's what public forms are for. The URL is stable and the same for everyone, so
you can link it from an admissions page, an enquiry auto-reply, or social media.
Each submission arrives as a separate entry on the Unassigned tab. Create the child from
whichever is correct, and the other can be assigned to that child afterwards or left as a
record.