How to Add Staff Members
The Staff management system allows you to register and manage staff members in the nursery management system. This process includes viewing all staff, adding new members, and configuring their profiles, schedules, and key child assignments.Staff List Overview
The main Staff page displays a comprehensive list of all staff members in your nursery setting. This view provides quick access to essential information and management tools.
- Name: Staff member’s full name with their profile picture shown in the first column
- Status: Shows either the last login date/time, “Invite Sent” indicator, or a dash if no invite has been sent
- Role: Staff member’s position (Manager, Staff, etc.)
- Email: Contact email address
- Actions: Edit, delete, and additional management options
Adding New Staff
To add a new staff member, click the Add Staff Member button in the top right corner of the staff list.Adding a New Staff Member
When you click Add Staff Member, you’ll be taken to the staff profile creation form. The workflow for adding staff follows these steps: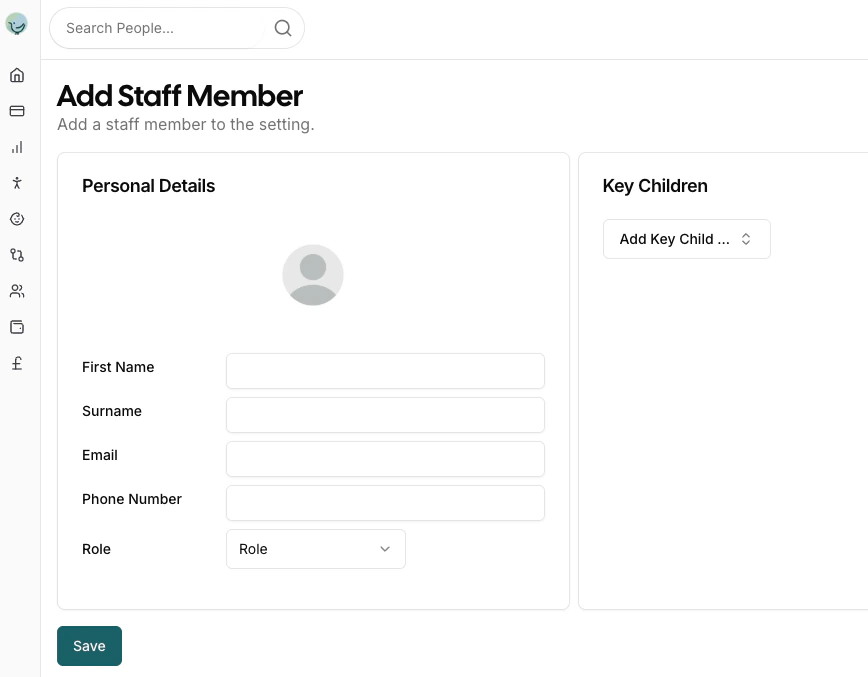
Step 1: Create Profile (Required First)
When adding a new staff member, you will only see the Profile tab initially. The Schedule tab becomes available only after you save the staff member’s basic profile information.Important: You must save the staff member’s profile information before you can access the Schedule tab. This ensures the staff member exists in the system before configuring their working schedule.
Personal Details
This section collects the staff member’s basic information including:- Profile Picture: Upload a photo for easy identification
- First Name: The staff member’s first name
- Surname: The staff member’s last name
- Email: Contact email address for communications
- Phone Number: Primary contact number
- Role: Select the staff member’s position:
- Manager: Full access to all aspects of the Pigeonhole system including admin functions
- Staff: Access to main nursery features (register, observations, child profiles)
Key Children
The Key Children section allows you to assign specific children to the staff member as their key person. This is important for:- Establishing primary care relationships
- Ensuring continuity of care
- Meeting regulatory requirements for key person assignments
Step 2: Configure Schedule (After Saving Profile)
Once you’ve saved the staff member’s profile, the Schedule tab becomes available. This is where you configure the staff member’s working schedule.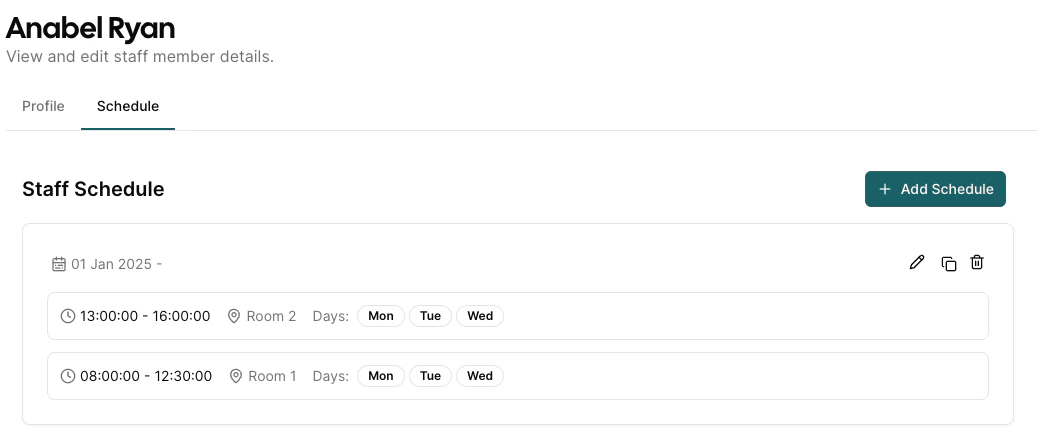
Staff Schedule Management
The schedule section displays all configured working periods for the staff member, showing:- Date Range: When each schedule period is active (e.g., “01 Jan 2025 -”)
- Time Periods: The working hours for each shift (e.g., “13:00:00 - 16:00:00”, “08:00:00 - 12:30:00”)
- Room Assignment: Which room the staff member is assigned to during each period
- Days: The days of the week the schedule applies to (Mon, Tue, Wed, etc.)
Adding a New Schedule
When you click Add Schedule, a dialog opens that allows you to configure all aspects of a staff member’s working schedule: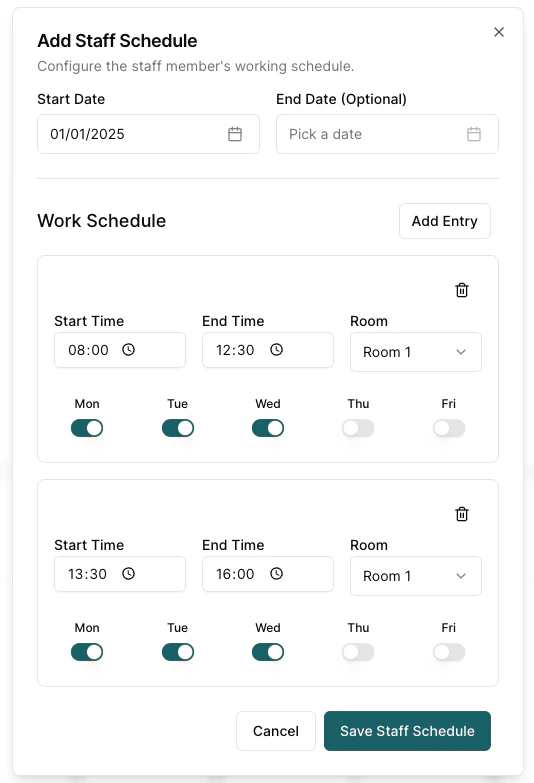
- Start Date: When the schedule becomes active (required)
- End Date: When the schedule ends (optional - leave blank for ongoing schedules)
- Start Time / End Time: The working hours for this period
- Room: Which room the staff member will be assigned to during this time
- Days of the Week: Toggle buttons for Mon-Sun to select which days this schedule applies
- Split shifts (e.g., morning and afternoon sessions)
- Working in different rooms at different times
- Complex scheduling arrangements
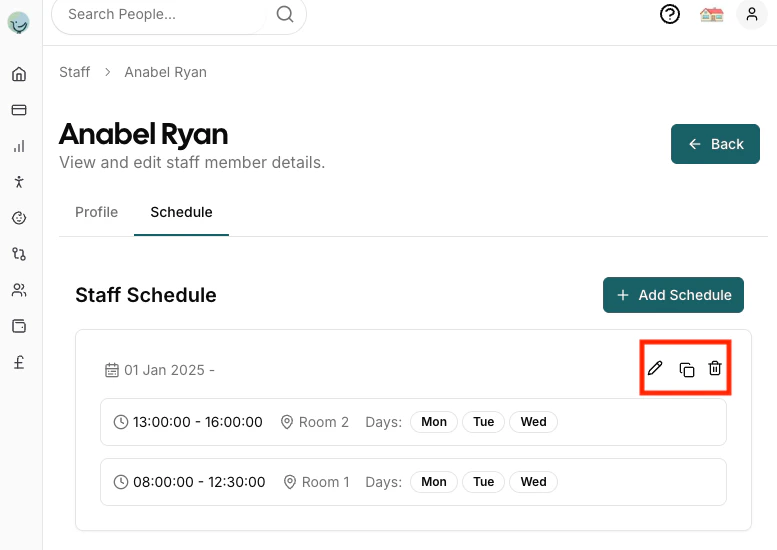
- Edit: Modify an existing schedule using the pencil icon
- Copy: Duplicate a schedule to create similar entries using the copy icon
- Delete: Remove a schedule using the bin icon
Staff Login Status
The staff list shows the current login status for each staff member:Status Indicators
- Last Login Date: Shows the date and time when the staff member last logged in (e.g., “10 Feb 2026 14:30”)
- Invite Sent: A blue mail icon indicates an invitation email has been sent but the staff member hasn’t logged in yet
- Dash (-): No invitation has been sent yet
Sending Invitations
To grant a staff member access to the system:- Click the More Actions (…) button on the staff row
- Select Send Invite
- The staff member will receive an email with a login link
Staff Additional Permissions
In addition to the primary role (Manager or Staff), you can grant staff members additional permissions to access specific areas of the system. These permissions are configured in the staff profile under the Permissions section, which appears when the Role is set to Staff.Managers have access to all aspects of Pigeonhole, except the ability to edit and sign off safeguarding concerns. Only assigned safeguarding leads can do this.
Available Permissions
Safeguarding Lead- Responsible for child protection and ensuring the safety and well-being of children
- Has access to all safeguarding data in Pigeonhole
- Can review, sign-off, and manage all records of concern
- Supports the safeguarding lead by recording concerns and ensuring appropriate actions are taken
- Has access to all safeguarding data in Pigeonhole
- Can view and record concerns, but cannot sign-off records of concern
- Has access to invoicing management
- Can create, edit, and manage invoices for children and families
- Has access to funding form management
- Can create, submit, and manage funding applications and forms
Configuring Permissions
To add additional permissions to a staff member:- Open the staff member’s profile by clicking the edit icon in the staff list
- In the Permissions section, check the boxes for the permissions you want to grant
- Click Save to apply the changes
Important: Staff members may need to sign out and sign back in for permission changes to take effect.
Permission Combinations
You can grant multiple permissions to a single staff member. For example, a staff member could be both a Deputy Safeguarding Lead and a Funding Manager, giving them access to both safeguarding and funding features.Managing Existing Staff
From the main staff list, you can:- Search: Use the search bar to quickly find specific staff members
- Edit: Click the edit icon to modify staff details and schedules
- Delete: Remove staff members
- Send Invite: Send an invitation email to allow the staff member to log in