Adding Payments to Invoices
If your nursery uses accountancy integration (such as Xero, QuickBooks, or Sage), payments will be automatically created in Pigeonhole when they are recorded in your accounting system. This ensures payment records stay synchronized across both platforms and reduces manual data entry.
- Navigate to the Invoices page
- Find the invoice you want to add a payment to
- Click “Edit Payments” in the actions menu (three dots) next to the invoice.
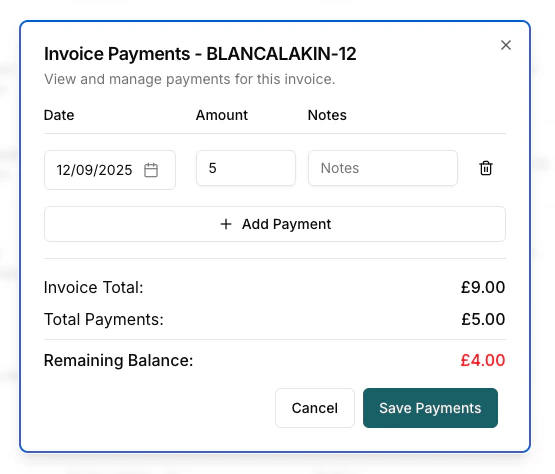
- In the payments dialog:
- Click “Add Payment” to create a new payment record
- Enter the payment date, amount, and optional notes
- Click “Save Payments” to record the payment
Viewing Payment History
To view payment records for an invoice:- Click “View Payments” in the actions menu next to any invoice
- This opens a read-only dialog showing all payments made against the invoice
- The dialog displays:
- Payment date, amount, and notes for each payment
- Invoice total and running balance calculations
- Total payments made and remaining balance
Payment Integration with Accounting Software
When accounting integration is enabled:- Payments recorded in your accounting software automatically sync to Pigeonhole
- You cannot manually edit payments for integrated invoices (they show as read-only)
- Payment statuses and balances update automatically when changes are made in your accounting system
- This eliminates double-entry and ensures data consistency
Sending a Payment Confirmation Email
Once an invoice has been fully paid, you can send a confirmation email to the bill payers to thank them and provide a record of the payment. To send a payment confirmation:- Navigate to the Invoices page
- Find a Paid invoice
- Click “Send Payment Confirmation” in the actions menu (three dots)
invoice.pdf— the original invoicereceipt.pdf— a freshly-generated payment receipt
The confirmation is sent manually from the invoice actions menu. It is not triggered automatically when an invoice becomes paid, so you can choose when (or whether) to send it.
Payment Receipt PDF
The payment receipt PDF includes the following summary information:- Invoice Total — the original invoice amount
- Total Paid — the sum of all payments recorded against the invoice
- Remaining Balance — the amount still outstanding. If the invoice has been overpaid, this is shown as Overpayment (Credit) in green, so you can easily see when a credit should be applied to the parent’s next invoice.